Why is my sensor giving the wrong measurements?
You've installed a new sensor for your remote monitoring project, but the data coming in doesn't look right. It's a frustrating problem and in many cases, the cause of faulty measurements lies in incorrect wiring or incorrect sensor configuration.
When connecting a sensor, a simple mistake can lead to a big headache. Forgetting a wire, connecting it to the wrong sensor connector, or even following the connection diagram for a different model can cause the sensor to send inaccurate data. In the worst-case scenario, incorrect wiring can even lead to irreversible damage to the sensor itself.
How to troubleshoot your sensor
If you're facing this issue, don't worry. You can troubleshoot the problem by checking a few key things.
1. Check your wiring and connection diagram
A frequent cause of incorrect data is a miswired sensor. Double-check that you've connected your sensor's wires correctly to the Sensor Adapter by following the right connection diagram. You can find all connection diagrams here.
2. Confirm the right sensor adapter and template
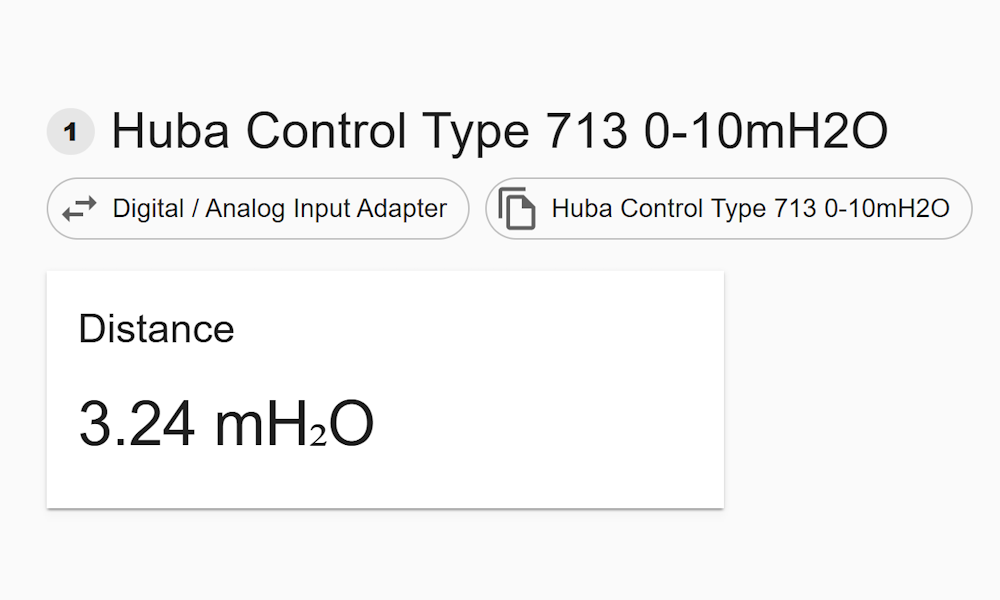
Make sure you've connected your sensor to the correct adapter. For example, a sensor with a 4-20 mA output won't work with a Digital/Analog Input Adapter. The information sticker on the adapter says what type it is.
The connection diagram for your specific sensor will also show you which adapter you need. After that, be sure to select and configure the correct sensor template in the Crodeon Dashboard to ensure the data is interpreted properly.
3. Check whether the adapter & sensor are connected to the right connector
Reporter has four sensor connectors (or ports). When you connect your adapter and sensor to connector one, you should configure the matching sensor template on connector one as well. The same goes for the other ports.
Sometimes customers run into issues when they configure the sensor template on connector one, but connect the hardware to connector four, for example. Always double-check if your hardware is actually connected to the correct physical sensor connector.
Every Reporter comes with clear indications of the connector number stamped into the casing.

4. Is there an incorrect configuration due to the wrong sensor template?
Even if you've correctly wired your sensor and connected it to the right adapter and port, your measurements can still be wrong if you select the incorrect sensor template in the Crodeon Dashboard. The sensor template is crucial because it tells the Dashboard how to interpret the electrical signal coming from your specific sensor model.
For example, if you have a pressure sensor that measures from 0-2 meters but you select a template for a 0-10 meter sensor, the Dashboard will misinterpret the data, causing all your readings to be off. Always double-check that the sensor template you choose on the Dashboard perfectly matches the hardware you've installed. This is a common and easy mistake to make, so paying close attention to this detail can save you a lot of troubleshooting time.
5. Confirm the offset calibration in the Crodeon Dashboard
Sometimes a sensor may have a preset offset that is skewing your data. You can adjust this by following these steps in the Crodeon Dashboard:
- Go to 'Configure Reporter'.
- Scroll down to the sensor channel you want to change.
- Click the three dots in the top right corner of the sensor's channel.
- Click 'offset calibration'.
- Adjust your settings and click 'save'.
Still having problems?
If your measurements are still incorrect after following these steps, our support team is ready to help. You can contact us directly at support@crodeon.com.
To help us resolve the issue as quickly as possible, please include the following information in your email:
- A detailed description of the problem.
- Photos of your wiring and the entire setup.
- A photo of your sensor that shows the type and model (usually there’s a sticker with information or it’s engraved).
- A list of the troubleshooting steps you have already tried.